Calculated loft and measured loft are very different things.
Here we have a chamber, filled with down. We can physically measure its loft. To do so, ideally, one would measure its high spots and low spots to average them.

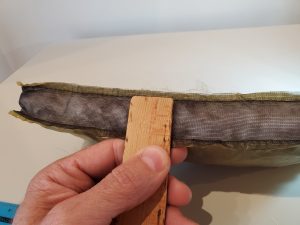
It looks like our chamber has an approximate high spot of 1.75″ at mid-chamber and a low spot of 1″ at the baffle. Therefore, its “measured loft” across the item should be communicated as 1.375″ average measured loft. While this metric is far more useful as a metric than total fill weight, it doesn’t account for density very well. I could fill this little chamber with more down and its R-value would increase, while its measured loft might not increase, or might only increase a small amount. So we want to know how much down is in a given area as much as we want to know the loft space it is occupying.
Typically, it should be pretty easy for a builder to communicate how much down is in any space. The process looks like this. For our little chamber, we have a length of 10″, a width of 5″, and a baffle height of 1″. We are going to fill it with 900 fill power down, so we know that will fill 900 cubic inches with one ounce of down. So, we can take 10 x 5 x 1 = 50 cubic inches for our chamber volume. If we want to put 50ci of down into that 50ci space, we then divide by our fill power 50 / 900 = .056 ounce of fill. That looks like this…..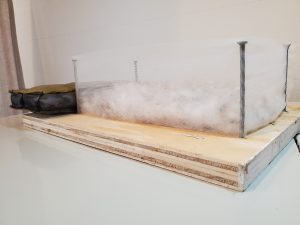
As you can see, as we calculated, this amount of down will just fill the exact volume of the chamber. This would be a calculated loft of 1″ and an overstuff density of zero. We would also refer to it as “base fill” or “base fill amount”. Of course, no one should actually fill a chamber to this level. Since there is zero density, the fill would shift around and leave open gaps. Also, when out on the trail where there is moisture, body oils, etc, there would be no pressure in these chambers to fill in when some gets compromised.
What would normally happen is the builder would add the amount of overstuff density that they want to achieve the fill control they want. Our little chamber is filled to 160% overstuff and here is how that looks. If our chamber volume is 10 x 5 x 1 and we want the down volume to be 160% more, we simply take the baffle height and multiply it by 2.6. 1 x 2.6 = 2.6 and that is our calculated loft. We would calculate the fill amount like this 10 x 5 x 2.6 = 130 cubic inches of down, divided by 900 fill power = .145oz of down.

Here we can see the 2.6″ calculated loft that is in our chamber, sitting next to it for reference. It is simply the uncompressed loft of the down in the chamber. If a calculated loft of 2.6 is used throughout our item, we know the exact amount of down in any section and in all sections. If you know this metric, along with measured loft, you have a very clear picture of the R-value of any item, regardless of any variables. We don’t need to do any math to equalize fill power. 2.6″CL of 1000fp is the exact same as 2.6″CL of 800fp. We don’t need to match up similar items. A huge mummy bag with 2.6″CL will have the same R-value in each section as a minimalist quilt with 2.6″CL. A puffy jacket with 2.6″CL will have the same as well.
Much like R-value in a house, this as a stable foundation to assess warmth. In the house analogy, we could have a R30 walls so you know how warm a wall section is. However, if that wall has a big leaky window in it, we can then subtract whatever that takes away from the overall insulation. Similarly, we could compare two down items with 2.6CL and similar measured loft and know that each the same R-value per section, but if one is a leaky strap quilt and one is a closed bag, we could subtract whatever we think the quilt drafts would take away from “warmth”.